Technology lessons. What they study at technology lessons at school Good open lesson on technology boys
Open lesson on technology, class 5
Lesson topic:"Sources of current, conductors of an electrical circuit"
Tasks: educational: to expand the polytechnic horizons of students.
Educational: accuracy, responsibility
Developing: development of students' creative initiative, independence
Lesson type: combined
Lesson methods
explanatory - illustrative
reproductive
Partially - search
Learning tool: subject-natural objects,
Practical - labor activity
Emotional - job satisfaction
Visibility: diagrams, a battery, a light bulb with a cartridge, wires, a switch, instruction cards, electrical probes.
During the classes
1. Organizational moment
1 Greeting, checking readiness for the lesson
2 Message of the topic and purpose of the lesson
Guys, look carefully at your tables,
(on each table there is a battery, a light bulb, two paper clips, mounting wires) these are the materials necessary for the manufacture of a microcartridge.
And this will help us travel to the magazine "Young Electrical Engineer"
1st page of the magazine "One head is good, but two is better"
2nd page "Wise is he who has knowledge"
3rd page "The more science, the smarter the hands"
We are opening a new page "Technologies" section of the use of electrical energy.
2. Updating knowledge
And our front page of the magazine " One head it's good, but two better"
-Look around and tell me what works on electricity?
List the electrical appliances that work in your home? (students list)
From what sources of electrical energy do these devices work? (batteries of galvanic cells, accumulators, generators in a power plant)
What kind of power plants do you know? (HPP, CHP, NPP, etc.)
How is electricity transmitted over long distances? (wires)
- Take a close look at the wire and tell me how it is made. (Inside the wire - metal, outside - plastic)
Why do metal wires need to be insulated? (electric current has high voltage, which is life threatening)
Why does an electrician use rubber gloves and tools whose handles are insulated with plastic during work?
Why can't you turn on electrical appliances with wet hands?
Why should you never touch bare wires?
In all these cases, it can "hit" the current. Electric shock dangerous to human life
Reading safety instructions. Students sign in the magazine on "Safety"
We continue our journey
3. Presentation of new material
2 - page of our magazine "Wise is he who has knowledge"
What needs to be done to turn on the light bulb?
(Turn on electric switch)
The current source and the consumer of electricity are interconnected by conductors, form an electrical circuit. Therefore, in order to conduct current, the electrical circuit must be connected, and in order to stop the supply of current, the circuit must be disconnected.
Writing in a notebook
Connection and disconnection of the circuit is carried out using a switch.
The simplest electrical circuit consists of 4 elements.
Current source.
Switch.
Consumer.
Explorer.
Show a picture of a simple connection.
Electrical circuits that are used in everyday life are much more complicated than those shown in the figure. It is difficult to draw such circuits. That is why in electrical engineering it is customary to depict with the help of symbols. With the help of conventional signs, the image of an electrical circuit is called an electrical circuit
The convention game. I show a diagram, a battery, a switch, a conductor, a consumer.
Students find a diagram in themselves (see Appendix No. 1)
4. Laboratory - practical workdiagram and drawings see Appendix No. 2)
Task number 1 How are the pictures different from each other?
1.Easy connection
3. Parallel connection (children's answers)
Task number 2 Find a match between the picture and the diagram
1.Easy connection
2. Serial connection
3. Parallel connection
a) sequential
b) Simple
V). Parallel
Draw and label the diagrams
Working with an instruction card
1 Consider the electrical circuit diagram and determine the elements of which it consists. (
2 Turn on the circuit one by one
A) serial connection
B) parallel connection
3. Unscrew one bulb:
A) serial (output)
B) parallel (output)
4. Writing in a notebook.
5. Practical work.3rd page of our magazine "The more science, the smarter the hands"
1. Introductory briefing:
Repeat TB rules
2. Production of a product with a simple electrical circuit - "electronic quizzes" ( instruction card see Appendix No. 3)
6. Consolidation of knowledge and skills
What elements make up an electrical circuit?
What are electrical circuits and why are they needed?
Name the electrical connections.
7. Summing up.
- Today we learned a lot about electrical circuits, learned how to read the symbols of the elements of an electrical circuit and made an electrical quiz. I think we have achieved the goal of today's lesson.
8. Knowledge assessment.
9. Homework.
1. §1,2 pages 54-57 answer questions
Application No. 1
Application №2

Application No. 3
instruction card
1. Read the product description
«  The electric quiz is made from a double sheet of paper.
On the first sheet, images are pasted (drawn) and their names are written. Small holes were made nearby.
Strips of metallized paper are pasted on the second sheet. Strip width - 10 mm. The length is 20 mm more than the distance between the points placed through the holes near the figure and its name.
2.Pick up the right tools and materials.
Remember.
1. Holes should not be wider than the strip.
2 . Isolate the strips of foil from each other with pieces of paper.
Glue or draw a picture.
3. Choose a theme for the quiz
4. Check the product in action.
5. Make a border out of strips of colored paper.
Summary of the lesson on technical work in the 6th grade.
Topic: Nature protection.
Developed by: technical labor teacher MAOU secondary school No. 59 Khlestov S.V.
Lesson Objectives:
1. To educate in children a caring attitude towards the animal world.
2. Form a holistic perception of the world around.
3. Learn how to fight for the protection of nature.
Type of lesson: lesson-acquisition of new knowledge.
UUD
1. Cognitive
Familiarize yourself with measures for the protection and conservation of nature.
Help students understand the primary needs and concerns of people and animals in need of help. Understand the importance of animals in human life.
Analyze information. Generalize, navigate in a variety of ways to solve.
2. Regulatory
Formulate and maintain a learning objective.
Make a plan and sequence of actions.
Compare the course of action and its result.
3. Communicative
Develop the ability to express your own point of view.
Work in a group, provide assistance in cooperation.
Use speech to regulate your actions.
4. Personal
To cultivate the ability to perceive, feel and correctly understand the beautiful in nature and the surrounding life.
To educate in children a caring attitude towards nature, the animal world.
To form concepts of kindness, responsiveness.
Develop the creative potential of students.
Lesson objectives:
- contribute to the formation of cognitive interest in the material being studied;
Find out the importance of the forest in nature and human life;
Learn the rules of safe behavior in the forest;
To form the ability to generalize the acquired knowledge, to draw independent conclusions;
Education of the ecological culture of the individual, love for nature.
During the classes.
Organizing time. Building, checking the absent, seating in places.
Welcome speech, leading students to formulate the topic of the lesson.
Solve riddles.
Cheerful in the spring
Young in summer
Feeds in autumn
Warms in winter. (Forest)
The house is open on all sides, It is covered with a carved roof. Come into the green house, You will see miracles in it! (forest)
There was a saying in the old days:
A lot of forest - (do not destroy). Little forest - .. (take care). There is no forest -. (plant).
So, the last saying tells us the topic of the lesson. The forest, and the entire animal world living in it, is constantly being destroyed by human industrial activity, and sometimes simply by irresponsible behavior and attitude towards nature. However, if some part of the forest is destroyed, you can always plant a new one in its place, thus helping nature recover, just like with animals, if one of them has certain problems, it is almost always possible for a person to correct the situation. So, let's try again to name the topic of the lesson correctly.. NATURE PROTECTION!!!
That's right, let's open notebooks and write it in a notebook.
Mastering new material.
Before starting a conversation, I would like you to listen to a short message on the topic "Forests of the Chelyabinsk Region"
Forests are renewable natural resources.
The nature around us is protected by laws. Systematized codes of laws have been established: Land, Water and Forest Codes. (The term "code" is translated from the Latin "book"). Laws oblige us to take good care of land, water, forests, air, plants, animals and minerals.
What is the importance of the forest to humans?
SIGNIFICANCE OF THE FOREST: Home for plants, animals, mushrooms Defender of air, water bodies, soils A place for human hunting Source of berries, mushrooms, medicinal plants Source of wood
From the forest, a person receives benefits not only in the form of wood. The forest retains moisture and in drought gives it to the fields in the form of rain. Snow melting in the forest feeds rivers and lakes. Forests trap harmful impurities contained in the air and neutralize them. Field-protective forest belts protect the soil from dust storms, from destruction in the form of gullies and ravines by storm and melt waters, and retain snowdrifts that feed the fields with moisture. The roots of plants strengthen the soil, and fallen leaves and needles retain moisture in it.
You can not ruin the nests of birds, damage anthills. In just one day, a family of ants eats thousands of caterpillar forest pests.
3. terrible enemy of the forest. After the fire, a lifeless and gloomy desert remains for many years, where charred corpses of trees lie for many kilometers. No wonder they say: “1 tree 1 million matches, 1 match million trees”.
What can lead to a fire in the forest:
1. A fire left unextinguished.
2. Grass burning.
3. Games with matches in the forest.
4. Lightning.
5. A spark from a vehicle muffler.
Safety rules in nature:
Always call 01 in case of fire
Never set fire to dry grass!
Never throw lit matches and cigarettes in the forest;
Make fires only in designated areas.
In no case do not make fires in the forest in windy weather.
Do not set fire to dry grass in clearings in the forest;
Do not build a fire in a dry forest and on a peat bog, if necessary, kindle it on sand or clay, while always having a container of water and a shovel at hand so that you can immediately fill it with water or throw the flame out of control with earth;
Do not leave a flooded fire while smoke or steam is coming from it;
Do not use pyrotechnic products in dry forests and peat bogs.
Practical part of the lesson:
And now, when we have received a lot of new knowledge, let's imagine that we have all grown up, become scientists, and the direction of our work is Nature Protection.
There are 3 laboratories organized in our office, you will now be divided into 3 groups, and each group will work in turn in one of the laboratories.
Let's think about what such laboratories for nature protection can do.
The very first thing in protecting the forest is information. We need to constantly remind people of the rules for dealing with forests and animals. This is especially true for schoolchildren. How can the public be informed about environmental issues?
OPTIONS OF ANSWERS FROM STUDENTS GO
For example, in our school, the easiest thing is to draw a wall newspaper on the relevant topic and hang it in the hallway.
Thus, the first group will develop a wall newspaper. To do this, you have a sheet of drawing paper, various pictures. Your task is to select the necessary pictures, cut them out, place them on your newspaper and stick them, as well as provide the necessary signatures, slogans, possibly rules of conduct, etc.
The second laboratory, in comparison with the first, will reach a more mass audience. One option here is to distribute leaflets with relevant content. Leaflets can be handed out in the school corridor, on the street, and even just going home today, each of you can take a few leaflets and put them in the mailboxes of your neighbors. Your leaflets will be A4 size, you, like the first group, will need to place pictures on them and make appropriate inscriptions.
The third laboratory is already a manifestation of specific actions to help the animal world. There are many options here. Today I would suggest that you make bird feeders for birds that find it hard to survive the harsh Ural winters, and then hang them on the street and feed our smaller brothers. You will be given a certain set of materials from which you will need to make a feeder according to the presented sample.
The work time of each group in one laboratory is 15-20 minutes - when ready, then you change places. By the end of the second lesson, each group will have their own wall paper, their own leaflet design, and their own feeder. Thus, we will make a significant contribution to the conservation of nature.
Yes, before each transition to a new laboratory, each subgroup must provide a report on the work done in a nutshell.
WORK IN LABORATORIES,
Summing up the lesson, grading.
1. How does the forest protect nature?
2. Why are windbreaks planted?
3. How can we help nature?
Do you want to organize interesting labor lessons?
no specialist required! Is everything ready!
technology lesson kits
own production

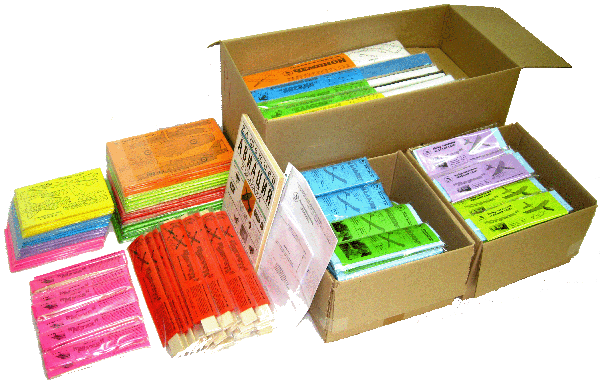
Aeromodelling at labor lessons - Technology
Set "Master classes for Technology lessons" for the academic year for 31,000 rubles.
– Sets of aircraft models - 10 master classes for 10 people. = 100 aircraft models!
- Instructions for manufacturing, design, adjustment, start-up.
- Manuals of mass events - games, exhibitions, competitions.
– Safety instructions and certificates .
– Curricula for circles and lessons of Technology.
- Specialist is no longer needed!
PROJECT WORK - school labor lessons, "Technology" for boys
With our sets you will be able to work on Projects - school labor lessons "Technology"!
At your school, at the Technology lessons, the boys will make a presentation and be able to sew up a CREATIVE PROJECT of an aircraft model, learn entrepreneurship at the PROJECT of creating a start-up - creating their own company for the production of aircraft models.
At the Aircraft Modeling Technology Workshops, your boys will learn how to build a real manufacturing plant!


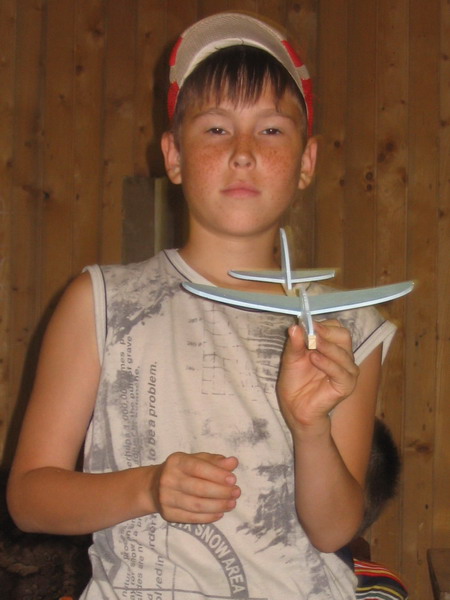
The current aircraft model-catapult on an elastic band. Set for creativity for boys "DIY".
At labor lessons, the boys themselves process aircraft model parts from various materials using different tools. They study aerobatics: roll, dead loop, flight with a roll to the right or left, takeoff with gliding.
Manufacturer (manufacturer) Russia. Our own production School of the group leader "Do It Yourself" Izhevsk.
Our kits for children's technical creativity are master classes for educational purposes for labor lessons - Technology designed for teaching labor processes assembly under the direct supervision of parents and teachers, the development of boys' skills in sports modeling.
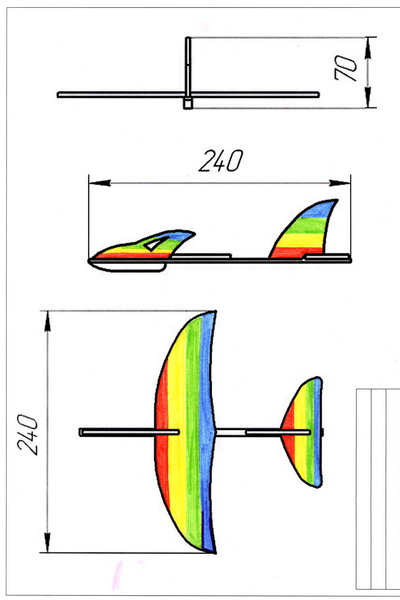
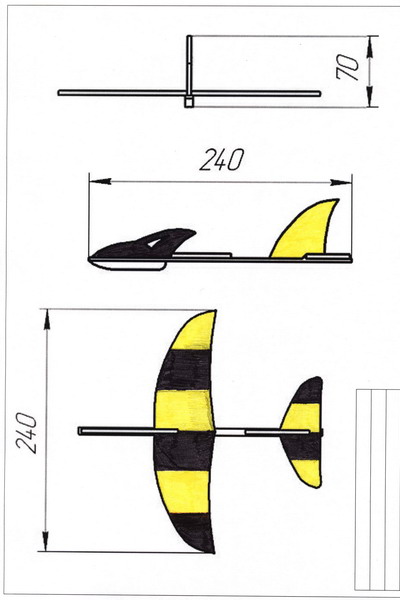
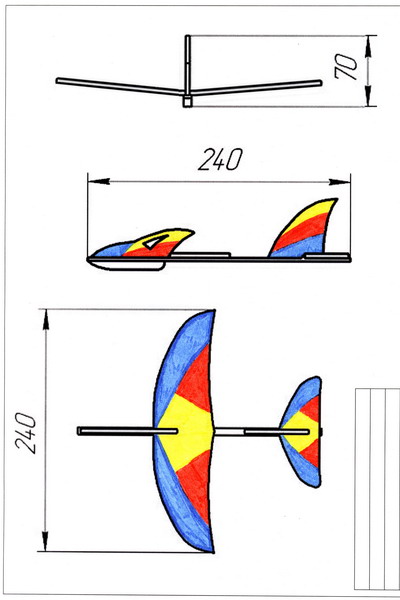
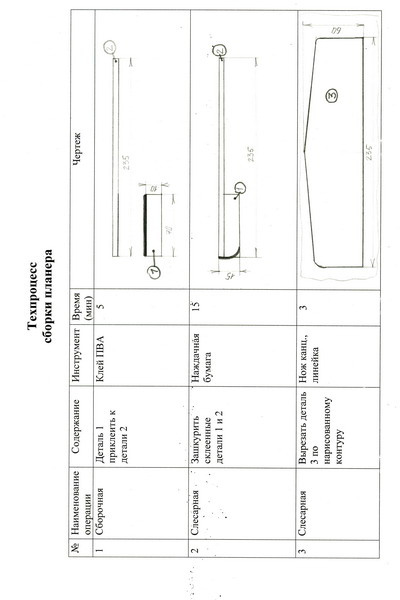
The composition of the aircraft model kit for Technology


1. Elastic band for launching an aircraft model catapult - 1 pc.
2. Rail-fuselage - 1 pc.
3. Rail-cargo - 1 pc.
4. Glider wing - 1 pc.
5. Tail plumage of model aircraft - 1 pc.
6. Label with instructions for the master class - 1 pc.
Required tool:
1. PVA glue or Titanium.
2. Stationery needles.
3. Stationery knife.
4. Skin.
Adjusting the flight of an aircraft model of a catapult aircraft.
At the lessons of labor - Technology, your boys will begin to learn the secrets of aerodynamics! Find out why the birds don't fall!
Schoolchildren will begin to understand why the plane does not flap its wings, but flies and does not fall like a brick!
You need to start glider launches in calm calm weather or in the gym and WITHOUT GUM-CATAPULT!
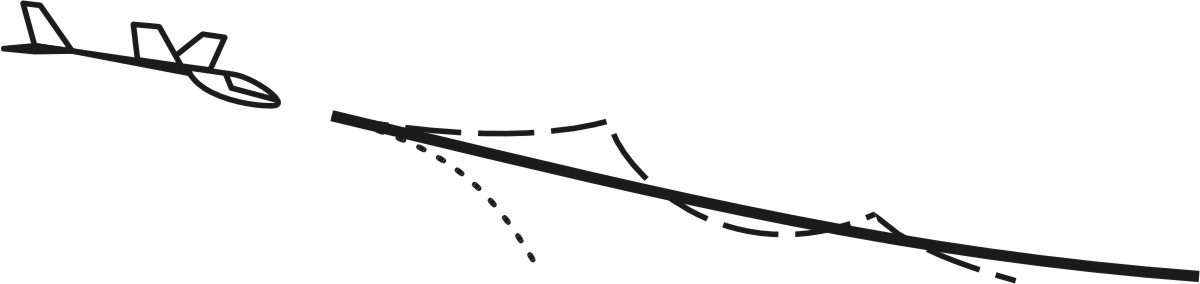
The first test of the glider is always done with the "glide" hand upwind. It’s even better to sit lower on your knees so as not to break the model aircraft.
Launch the model aircraft into the wind at a slight downward angle. If the model dives (.....) fold the trailing edge of the stabilizer up, if the model is pitching (- - -) fold the trailing edge of the stabilizer down. To prevent the plastic from cracking when bent, carefully crush the edge with your fingers (pinching). With proper adjustment, the glider will fly 10-15m.
WARNING - FRAGILE!
If the model aircraft flies with a right roll (to the right), bend the trailing edge of the right wing down and the left wing up.
- If the model aircraft flies with a left roll (to the left) - bend the trailing edge of the left wing down, and the right wing up.
A properly adjusted model aircraft should fly in a straight line for 10-15 m.
Aircraft model launch at Technology lessons
Launch of the aircraft model "Strizh".
At the lessons of labor (Technology), the boys will master the art of launching model aircraft. This requires training.
The boys will learn to perform aerobatics: horizontal and vertical roll, dead loop, banked flight to the right or left, takeoff with long gliding, strafing flight low over the ground.


The catapult glider should not be launched on the same day after the assembly is completed. The launch of a catapult aircraft on an elastic band is possible only when the glue is completely dry, the correct assembly of the aircraft model is checked and the wing, fuselage rack and tail unit are not distorted.
Before the first launch of the catapult, it is necessary to set up the aircraft model.
Training should only be started under favorable weather conditions (no wind). And also from a small height - up to 1 meter.
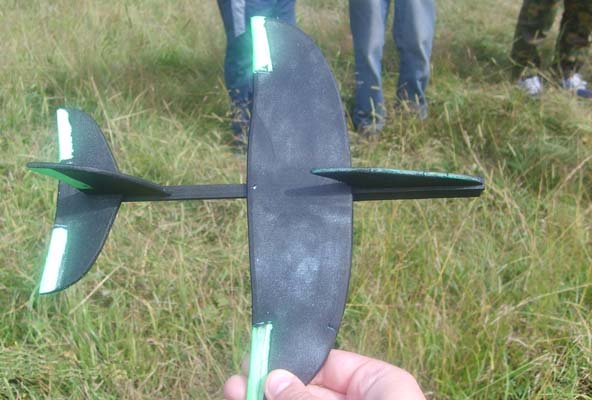
The finished aircraft model is launched with the help of an elastic band, hooking a rubber ring from below to a protruding weight rail in front of the fuselage (like a slingshot).
To do this (see figure), the free ends of the elastic are clamped in the left hand, and the resulting rubber ring is thrown over the thumb.
It is possible to make a device for launching: attach the ends of the elastic band to the stick-rail. Get a catapult with an elastic band. But in training to launch a model glider, the boys themselves refuse the catapult and use an elastic band in their hand. They say it's more comfortable...
Moisture is not allowed on the aircraft model. In this case, the airframe must be dried and re-adjusted - inspect the aircraft for distortions, and carry out additional adjustments.
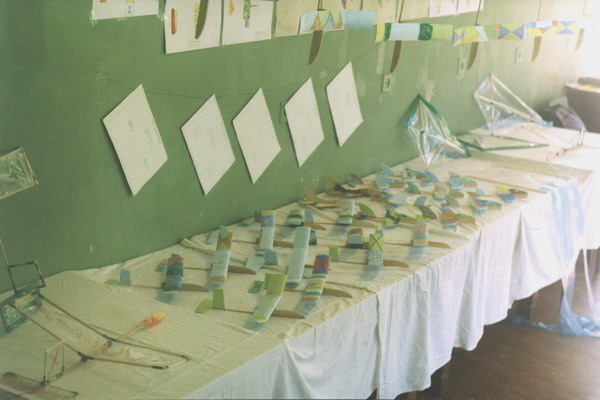
Aircraft model exhibition at the Technology lessons
You will get an aircraft model exhibition in the Technology class.
One of the results of the master classes at the lessons of labor - Technology, you will receive an exhibition of aircraft models with a bench assessment of the quality of workmanship and design.
Albums of drawings and sketches for painting aircraft models decorated by the hands of the boys.
Making an exhibition of aircraft models at school: it will be so!


One of the options for holding an exhibition at a labor lesson - Technologies:
A jury is selected from the participants, an even number - we recommend four members of the jury. The fifth is the decisive voice of the teacher or an invited authoritative member of the jury (for example, a girl).
Aircraft models are randomly laid out on a demonstration table.
Of all the participants, the most attractive aircraft model is selected each time. The criterion is the answer to the question: "Which model aircraft would I buy first of all the rest?"
Each time they choose the best aircraft model from the remaining ones, and lay it out on another table in descending order of quality.
Thus, a list is formed in descending order of quality, and, accordingly, the occupied place.
In case of equality of votes of the jury, the decisive word remains with the teacher or an invited authoritative member of the jury (for example, a girl).
Model Aircraft Evaluation Criteria:
1. Quality and accuracy of aircraft model manufacturing.
2. The idea and quality of design (coloring) of the aircraft model.
It is possible to conduct separate assessments of the design and manufacturing quality of the aircraft model (see protocol in the photo). In this case, the places occupied by the aircraft model at each stage are summed up. The aircraft model with the minimum number of places in all stages receives a higher place in the overall standings.


Before the open presentation, you will draw up a protocol for the exhibition of technical creativity and post it on the information stand of the school.
See the picture for a sample.
Aircraft modeling competitions at the lessons of Technology
You will hold real aircraft modeling competitions at our labor lessons - Technologies!
The most important mass event and the intermediate result of the master class you get aircraft modeling competitions.
Your school will receive full-fledged aeromodelling competitions with a bench assessment of the quality of manufacturing and design of aeromodels.


One of the many options for boyish competitions in the labor lesson - Technologies:
Exercise 1. Gates are placed (two racks-ski poles 3 m wide) at a distance of 5 m. You need to get into them.
Exercise 2. Two gates are placed on one straight line: the first - after 5m, the second - after 10m (corridor). The far gates are shifted in any direction by several meters. It is necessary to adjust the model aircraft so that it flies through the first and second gates with a certain turn.
You need to make several attempts to launch the model aircraft (see the protocol in the photo). In this case, the results obtained by the model aircraft in each attempt are summed up. The aircraft model with the highest score on all attempts in total gets a higher place in the final standings.
Today, the system of labor education in schools is undergoing changes. Their engine is the new norms of federal state educational standards (FSES), which, in particular, provide for a reduction in hours for technology lessons. A more detailed study of this subject will go into the so-called elective, that is, mandatory courses of the choice of students, and more attention will be paid to extracurricular activities. And here the decision must be made by the children themselves, what will become a priority for them - technology in courses and circles or some other science for in-depth study.
Recently, parents have repeatedly noted that technology lessons in schools are outdated. Life is moving forward, and labor education is marking time in one place, equipment is not being updated in most schools, more modern technologies are not being introduced.
"Cheryomukha" decided to find out if this is really so? What has changed in the labor-technology lessons lately, besides the name, how have the standards, within which the school lives, influenced them?
WHAT DO PARENTS WANT?
So that the children come out of school in the literal sense of universals.
Nikolay Solovyov, father of 12-year-old Anton and 14-year-old Natasha:“Girls would be able to cook not trivial dishes such as sandwiches and salads, but more complex ones, they would master cutting and sewing, the basics of housekeeping, they would be psychologically ready to start a family. The boys would know woodworking and metalworking and become technically savvy. It would be good if the children had medical knowledge.”
I agree with one thing - the foundations of medical knowledge in a person must be laid from adolescence. But this should be done by experts. But why not lay the knowledge listed above in the child's parents? But the realities of today are such that almost half of the children in each class are from single-parent families. As a rule, dads are absent. Mothers and grandmothers can still show and explain the basics of housekeeping to girls. What about the boys? The burden falls on technology teachers. And in complete families, parents who are preoccupied with making money practically do not see their children.

TEACHER'S VIEWPOINT
Technology teachers believe that today there is a stereotype about technology lessons that needs to be broken. There is an opinion: in the classroom, schoolchildren only do what they make stools and mops, and girls embroider with a cross. In fact, it's not like that. At least in those schools where I managed to visit during the preparation of this material. Today, children get acquainted with many areas - drawing, electrical engineering, technologies for processing various materials, housekeeping, repair and construction. For example, eighth-graders, as part of the regional vocational training program for schoolchildren, study modern industries and industries in the Yaroslavl region, universities and educational institutions in the region.
Technology includes several interrelated subjects: labor training, computer science, mathematics, geometry, drawing, physics. New educational standards provide for the possibility of introducing modern educational blocks into the educational process at the discretion of the teacher.
The problem is just who will promote modern trends in the city's schools? The average age of technology teachers is about 45-50 years old. In addition, there are not very many young professionals who want to go to work in school. There was a stereotype that they earn little here. But with a good teacher workload, you can get the average salary in the city. Plus vacation in the summer - 56 days, three times a school year vacation. There are also social guarantees. There is a regional mortgage lending program for the purchase of housing for young professionals.
Teachers are sure that it is necessary to revive the prestige of the profession of a school teacher and, as soon as possible, talk about its advantages, promote it among teenagers and parents. Maybe we should not wait for young specialists from pedagogical universities? Rybinsk has its own technical university. Why not introduce Pedagogy as an elective course in the undergraduate curriculum? And after graduation, attract them to work in schools.
The fact that in the modern world the lessons of technology are changing, told and Galina Chepurina, teacher of technology at secondary school No. 12 named after P. F. Derunov:“We work according to the program of Irina Sasova, which is based on the project method. And children do their work from idea to implementation. If earlier, at labor lessons, girls sewed napkins, and they all turned out to be almost the same, now everything is different. We recently completed a project on a theatrical puppet - and each child got his own, who wanted what and chose for himself.
Galina Alekseevna showed several design puppets - Smeshariki, others are made from ordinary spoons, the third one looks like a tablet puppet for a real puppet theater.
Galina Chepurina:“Having completed the project, the children present the results of their work - someone simply tells the manufacturing technology, and someone is preparing a whole performance. Isn't that interesting?"
Only the technology of making things remains the same - take measurements, master the seams. But creativity plays the main role.
Lilia Gladkova, technology teacher at secondary school No. 26:“I liked the new standards better, because they give an opportunity to develop the imagination of children through project activities. And children take on projects with great interest. Our goal as teachers is to introduce girls to new trends in applied art, to broaden their horizons. We are now studying the interior of the house, even the formation of the family budget. And we don’t just do anything - we knit, crochet, sew various products, make paintings in the style of batik. With the advent of the Internet, children now have more opportunities - they saw something there, and we do it in the classroom. We even cook cabbage soup virtually. The only pity is that they reduce the time for technology lessons.
 Photo from the personal archive of Stanislav Matchin
 And what about the boys?
There are so many handicrafts in the workshop of Stanislav Matchin, a technology teacher of secondary school No. 12, who this year became the winner of the Rybinsk stage of the Teacher of the Year competition. Flower stands, tablets and cell phones, notebooks made from obsolete computer materials - floppy disks, praying mantises made from the "stuffing" of incandescent light bulbs, indoor flower care kits, clocks from old records, airplane models, wooden devils for Halloween. The boys learn the basics of wood and metalworking, various technologies and tricks that will undoubtedly be useful to them in later life.
It is easier to learn the basics of cooking, to study cutting and sewing with girls. At what plan? The materials are not that expensive. I do not argue that sewing machines, electric stoves, dishes also cost money, but it is much cheaper than buying metal, wood and related machines, tools and devices for technology lessons from boys.
Sergey Zanin, technology teacher for boys of secondary school No. 26:“Technology lessons in schools are an expensive pleasure. They "eat up" about 40% of the funds from all subject support. Today, the cost of a school screw-cutting lathe is about 240 thousand rubles, plus 50 thousand will result in its installation and connection. And also the cost of tools and fixtures. Therefore, the hours for working with metal are reduced. More time has been devoted to arts and crafts.”
Sergei Nikolayevich showed samples of wood and metal products that they have made and are doing with boys at technology lessons. Today's children produce products that are simpler than those of children in the 80s and 90s. The reason is logistical problems. The equipment and tools are worn out, and, as always, there is not enough to purchase new funds. At one time, enterprises provided assistance to schools with both tools and machine tools.
In order to make labor lessons more high-tech today, we need a base, equipment, materials, specialists, after all. Today, unfortunately, there is no continuity among teachers. After all, the teacher, before giving the child knowledge, must himself be able to work on machine tools and with his hands. There is currently a shortage of technology teachers for boys. In some schools this subject is taught by women. What can they teach the boys? Yes, they will give theoretical knowledge from the textbook, but the most important thing is practice, for which 75% of the study time is given according to the program.
 Photo from the personal archive of Stanislav Matchin
 Sergey Zanin:“I believe that we should teach the child to work with his hands and give the basics of working with various tools, on machines. And then he himself decides in which direction to improve. If we go a little deeper into history. You know that Bismarck introduced labor training in German schools for the first time. And the emphasis was on manual labor. After that, Germany began to develop rapidly as an industrial country. And it is still developing. France, England, and the USA followed suit. Our country at the beginning of the 20th century was one of the leaders in manual labor, at that time there were about 5 thousand teachers.”
After our conversation, I approach the boys who have just mastered the electrical business at the technology lesson. Judging by the burning eyes, they like it.
What else would you like to do in technology classes? I ask them. The guys just smiled and ran to the break. Sergei Nikolaevich came to their aid:
“Our goal is to instill a love for work, to interest children, to captivate them with creativity. But this requires materials, tools, machines, designers.
HIGH-TECH VIEW FROM RSATU
Aside from the standards, what could be the technology lessons at school? Cheryomukha addressed this question to one of the teachers of the Rybinsk State Aviation Technical University. He has his own vision, quite original.
Andrey Pechatkin, head of the Department of Radio Electronic and Telecommunication Systems of the RSATU, candidate of technical sciences: “In my opinion, you can go into more interesting areas, for example, robotics, which combines many areas of knowledge. And both girls and boys can do it. At the first stage, the child constructs his robot. What function he will perform depends only on his imagination. In this case, children turn to such a field of knowledge as mechanics. Created an object. Now you need to “breathe” life into it so that the robot can carry out the simplest commands - move in different directions, raise its hands, take something. Here, sciences such as programming and computer science are already “entering” into business. After that, it can be made more elegant - using a 3D printer to shape it. In this case, children are already mastering computer-aided design systems. The robot can be made multi-colored.

Modern technology, which, by the way, is safe for the child, allows you to do this. In addition, the robot can be radio-controlled. And let these toys grow with the children. And you can arrange competitions - whose robot will overcome obstacles faster, get from point A to point B - fantasize ad infinitum. But it is possible to create more real devices for the needs of the school, for example, thermal imagers - devices for monitoring the temperature distribution of the surface under study. With their help, to fix whether there is a heat leak in the school, to examine the body of a person and animals, plants, to answer the question of what happens to the conductor when an electric current passes through it.
What will be required to create robots? Typical kits for creating them, a computer and software, design programs and a 3D printer - everything, by the way, can be purchased today.
What will the reduction of hours for technology lessons at school lead to? Probably, to the fact that children will work less and less with their hands. Everything that surrounds us is created by labor and hands. Labor is the basis of human life. Therefore, technology lessons at school should be productive. Labor is connected with the foundations of all sciences. He brings up many qualities in a person: discipline, caution, perseverance, eye, perseverance, attentiveness. In the end, it forms a person out of a child.
- Svetlana Bakunina
Topic: "Manufacturing of wooden utensils"
Teacher: Mukhazhanov E.Zh.
Goals:
1. Introduce the new word “utensils”, explain the meaning.
2. To teach the techniques and sequence of processing the internal curvilinear contour of the part.
3. Use the knowledge and skills acquired by students earlier when performing more complex products.
4. Work out the skills of manual woodworking.
5. Use an individual approach when repeating the material covered and distributing the practical task.
6. Raise the need for creativity, the desire to bring beauty into your life.
7. Develop skills in planning, self-assessment, self-control.
Lesson type: combined.
Equipment, equipment classes:
- sawing tables;
- electric jigsaws;
- knives;
- files, needle files;
- sanding paper;
- templates, pencils.
Visual aids:
- samples of finished products;
- posters, stands.
Lesson plan:
Organizational part (2 min.)
Review (5 min.)
Explanation of new material (20 min.)
Consolidation of acquired knowledge (3 min.)
Practical work (40 min.)
Final part (10 min.)
Lesson progress
1. Organizational part.
Mark those absent, appoint attendants, check readiness for the lesson, inform the topic of the lesson.
2. Repetition of the past.
Offer students thematic crossword puzzles on the topic “Marking”, “Drilling”, “Sawing”.
3. Explanation of new material.
A tree is an amazing, generous gift of nature, which has been valued by mankind throughout its history.
The tree has been in use since ancient times. Availability, ease of processing and natural beauty have made it a favorite ornamental material.
And if today each of us looks around, we will undoubtedly be convinced that the tree plays an important role in our life. And maybe because in many areas of our life it was pushed aside, and sometimes completely replaced by new synthetic materials, today we have begun to appreciate even more its unique beauty that connects us with the natural world.
Wood is a very durable material that can give a wide variety of forms in the hands of a skilled craftsman, and products from it sometimes serve for several generations.
These products include items of wooden kitchen utensils.
The word “utensils” comes from the old Russian word “utensils” (dress up, clean, decorate). And now, "utensils - jewelry, clothes, jewelry, everything movable in the house: furniture, jewelry, utensils". (Explanatory Dictionary of the Russian Language by V.I. Dahl).
In the dictionary of the Russian language by S. I. Ozhegov, “utensils are objects, accessories of some kind of household, for example, household utensils.”
In our case, these are items of wooden kitchen utensils: cutting boards, hot coasters, wooden spatulas.
For centuries, according to historians, “many different wooden products were made everywhere, which were indispensable in the life of the people.”
Today at the lesson we start making wooden kitchen utensils.
Show samples of future products, name the material from which the items will be made.
It would seem, why do we need it now, when there are convenient and cheap products made of plastic and metal?
The thing is that this is how people's need for beauty is expressed. A. M. Gorky said that “man is an artist by nature, he everywhere, one way or another, strives to bring beauty into his life.”
“There should be the greatest attention to folk traditions, they must be studied and perceived with all one's heart, they must be mastered,” wrote A. B. Saltykov.
Another interesting observation.
The words “utensils” and “creativity” have a common root with alternating vowels:
This is the root “creature” - “creation”, vowels “a” and “o”.
And according to the definition of S. I. Ozhegov:
CREATIVITY is the creation of new cultural and material values.
CREATE - create creatively.
Thus, starting to manufacture items related to the kitchen, i.e. the place where a person prepares and eats food, we will not just cut with a jigsaw, we will “creatively create new material values”.
In addition, handmade items are of particular value in the house.
Again, refer to samples of future products.
Note that when working, we will rely on the knowledge and skills already gained in previous lessons: in marking, drilling, sawing with a jigsaw.
Pay attention to the fact that until now, while working with a jigsaw, students sawed plywood 4 mm thick, and in this lesson they will use a 6 mm container board, birch and beech slats for work, and they will have to cut both the outer and inner contour of the part.
When processing the inner contour of a part, there are several methods of work
Sharp corner sawing:
I - th method - if the ornament is large, then an acute angle can be cut out in the same way as a blunt one, i.e. by turning in place, but at the top of the corner, the jigsaw file is fed towards itself so that there is no excessive rounding. When sawing out a thin ornament, one side of the corner is sawn to the top, then, returning the file back, they saw through an arbitrary line so as to get to the adjacent side of the corner tangentially and continue sawing to the top of the corner. At the top of the corner, a sawn piece falls out, and an acute angle is formed. Then align the adjacent side of the corner.
II - th way - smoothly go to the adjacent side of the corner, without reaching the top, cut out the outline, then align both sides of the corner.
If, when cutting out the outer contour, with a jigsaw in the right hand, it is necessary to cut counterclockwise, then the inner one - clockwise, so that the marking line is visible during operation.
First of all, the inner ornament is cut out, and lastly, the outer contour. It has to do with safety at work.
After sawing, the part must be cleaned and polished.
4. Consolidation of the acquired knowledge.
Ask repeat questions:
what does the word "tool" mean? Give examples of household utensils;
in what sequence and why is a part having an outer and inner contour cut out?
in what direction and why is the part cut along the outer and inner contours?
5. Practical work.
Explain the sequence of the practical work written on the chalkboard:
Mark the workpiece according to the template.
Drill a hole inside the contour.
Insert the file, fix it in the frame.
Cut out the inner contour of the part.
Remove the file from the part, fix it in the frame.
Cut out the outer contour.
Clean up, grind.
Remind about safety rules during practical work:
when drilling;
when cutting with a jigsaw;
when cleaning and grinding.
Set a task for the lesson.
Give each student an individual assignment.
Monitor the work of each student, provide assistance if necessary, explain the points that cause the greatest difficulties.
6. Final part.
Tidy up your workspace.
Donate tools and finished products.
Invite students to evaluate their own products in comparison with samples.
Check assembled items.
To sum up the results of the repetition of what has been covered (by crossword puzzles) and practical work.
Application.
Crossword #1
Theme: "Sawing".
Question (vertically):
1. Thin and narrow metal strip with teeth.
2. Damaged item.
3. Operation performed after sawing.
Crossword #2
to test students' knowledge.
Technology. Wood processing.
Theme: "Markup".
Task: identify the word horizontally denoting a tool.
Questions (vertically):
1. A tool for drawing marking lines on a workpiece.
2. A tool for marking and controlling right angles.
3. A tool for drawing straight lines, sizing.
Crossword #3
to test students' knowledge.
Technology. Wood processing.
Theme: "Drilling".
Task: identify the word horizontally denoting a tool.
Questions (vertically):
1. What is formed in wood during drilling?
2. A tool used for manual drilling.
3. A tool for marking the center of a hole before drilling in wood.


